After much procrastination, I finally extracted the digit & made myself a reed tx


It is a full 12 channel
Reeduino with compound single channel (I've never flown sequential), V-Tail mix and Auxiliary function, using Phil's code running on a blue 328P board. Never being one to do things the easy way, I thought I'd share some of my "experiences" during the building & commissioning.
 The Case:
As a typical frugal (aka tight) modeller I re-purposed an old aluminium project case that I had in stock from a home made 2 channel radio from the mid-70's. The level of metal working skills(?) I exhibited at the time are evident in the pictures - as much a reflection of my haste as anything else!
Anyway, the question was how to fill all those holes and make the case usable? After I cleaned the original covering off the case, I thoroughly cleaned it inside and out, focusing on removing all traces of adhesive. I then filed and rubbed down all the cutouts removing all burrs. After another thorough clean, I then placed
Kaptan tape on the outside over all holes in the case, making sure to pull it as taught as possible. I then turned the case over onto its face and filled all the holes with 30 minute epoxy, the whole lot then being cured in the oven at 100C for about an hour. After filing any excess resin off internally, I then glued a piece of 3mm ply to the inside of the case front - it's purpose was 2-fold; to provide additional support to the resin in-fills in the numerous old holes and to hopefully provide a more consistent resistance to the drill bits when I started drilling all the new holes.
 Viewed 5875 times")
 Viewed 5875 times")
All the holes were then marked out on the outside of the case prior to drilling. I tried to position all of them in aluminum sections of the case rather then in a resin in-fill, for the most part succeeding. Even though I drilled very carefully using sharp bits, a few holes "walked" a little bit at any aluminium-resin junction as the bit size increased. Its noticeable to me, but if others have noticed, they have been too polite to comment!

Black automotive vinyl cladding was used to hide the many past sins. It stuck extremely well, and to my surprise even showed up the
Kaptan tape overlaps, and that tape is pretty
thin!!
Switches and pots:
I initially used guitar switches sourced via eBay, modified as per discussions on the previous forum. Unfortunately, these were obviously the cheap versions. I found that while fiddling on the bench, if the switch toggles were moved regularly past about 1/2 travel in either direction, the leaf spring contacts would deform (i.e. the metal in the spring contacts was too soft), making the reliability deteriorate over time and the switch action intermittent as well as feel spongy.
 Viewed 5875 times")
- with the original cheap eBay guitar switches
I happened upon another switch on eBay available from a local supplier here in Aus. These turned out to have a very positive action while not needing excessive force to operate. The included black rubber boots match the black case as well as improving the appearance and comfort of the switches.
 Viewed 5875 times")
- with the new switches installed
I have since ordered replacement guitar switches, which from the pictures at least, look like the ones used by others in their reed Txs.
Initially, I have installed the travel speed pot on the top of the case. It is mounted in the hole cut for a telescopic antenna base. When I'm comfortable with the servo travel speed, I'll probably move the pot internal.
Module mounting:
The FrSky module is mounted on its side. I utilised the ply plate glued inside the case by cutting a groove into it to insert one of the two locking tongues on the module. A ply gusset keeps the module vertical, the module then held in place by a rubber band looped around the other locking tongue to a screw in the gusset – Simple and crude but effective

.
This simple arrangement enables me to swap modules easily as well as ultimately use the 29, 36 & 40MHz modules & numerous Rx's I have. The hole for the telescopic antenna is already cut, I just have to fit the antenna base fitting. With the rear case cover removed I have ready access to the module for binding and the back of the module for the connector.
Software:
As stated previously, Phil's
Reeduino code is used. The only changes were to amend the code to use JR channel sequence and the auxiliary channel. Both easy to do following Phil's instructions in the code. I used a 3 position switch for the auxiliary channel wired the same as the main self-centering guitar switches. The auxiliary servo travels to either extreme when the switch is in the first or third positions, but stops when the switch is placed into the second/middle position, similar to the trim function.
Labels:
Taking a leaf out of Ron's book (as well as pinching some of his examples

), I've made up suitable labels for the front & rear of the Tx. When finished & installed, these will improve the Tx’s appearance noticeably as well as hiding some of the imperfections on the front of the case!
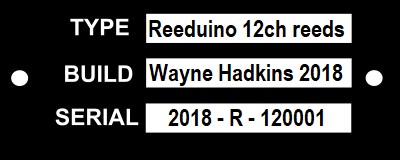
- SERIAL.jpg (22.03 KiB) Viewed 5875 times
The Final Product:
The completed Tx works exactly as it should - most satisfying

Thanks Phil for developing and sharing the code

Hopefully, somebody may glean a useful idea or two from my experiences building my
Reeduino.
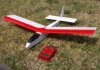
What to Fly it in?
It's well over 45 years since I flew with a reed set, and that was in a glider

. Consequently, I'll need to build something suitable to get the brain and fingers sufficiently coordinated with this new old Tx configuration

. Some months back, I bought a
Club Trainer fuselage from
Hobby King for just a few dollars. That will be the basis for my Reed (re)Trainer. I shall post pictures & a flying report later.......